


AUSTAUSCH IHRES BREITLING ARMBANDS
Wechsel Lederarmband
Wechsel Metallarmband
Einteiliges Uhrenarmband wechseln
Wechsel Lederarmband

SCHRITT 1
NEHMEN SIE IHR NEUES BREITLING ARMBAND AUS DEM BREITLING REISEETUI UND PLATZIEREN SIE IHRE BREITLING UHR AUF EINER FLACHEN, GLATTEN OBERFLÄCHE. LEGEN SIE DIE UHR AUF DAS «GESICHT», SODASS SIE DEN GEHÄUSEBODEN SEHEN.
SIE KÖNNEN DAS BREITLING FEDERSTEGWERKZEUG VERWENDEN, SOFERN SIE EINES BESTELLT HABEN, ANSONSTEN FUNKTIONIERT DER AUSTAUSCH AUCH MIT EINEM HERKÖMMLICHEN BANDWECHSELWERKZEUG.

SCHRITT 2
ENTFERNEN SIE DAS ALTE ARMBAND.
HALTEN SIE IHRE BREITLING UHR FEST UND PLATZIEREN SIE DAS GEGABELTE ENDE DES WERKZEUGS ZWISCHEN EINEM DER BANDANSTÖSSE UND DER SEITE DES ARMBANDS.
DRÜCKEN SIE DEN FEDERSTEG AUS DEM BANDANSTOSSLOCH UND WIEDERHOLEN SIE DEN VORGANG AUF DER ANDEREN SEITE.
TIPP:
DURCH VORSICHTIGE HANDHABUNG VERMEIDEN SIE DAS ZERKRATZEN DER INNENSEITE DES BANDANSTOSSES.

SCHRITT 3
FÜGEN SIE DAS NEUE ARMBAND ZWISCHEN DEN BANDANSTÖSSEN EIN.
ORIENTIEREN SIE SICH AN DER TABELLE, UM IHR NEUES BREITLING ARMBAND DER SCHLIESSE ENTSPRECHEND KORREKT ZU POSITIONIEREN.
HALTEN SIE IHRE BREITLING UHR FEST UND FÜHREN SIE MANUELL EINEN STIFT DES FEDERSTEGS IN DAS BANDANSTOSSLOCH EIN.
TIPP:
VERWENDEN SIE DIE KORREKTEN FEDERSTEGE FÜR IHR ARMBAND.

SCHRITT 4
WÄHREND SIE DEN FEDERSTEG IN POSITION HALTEN, DRÜCKEN SIE DEN ZWEITEN STIFT DES FEDERSTEGS MIT HILFE DES GEGABELTEN ENDES DES WERKZEUGS IN DAS GEGENÜBERLIEGENDE BANDANSTOSSLOCH.
DREHEN SIE IHRE UHR UND WIEDERHOLEN SIE DEN VORGANG MIT DEM ZWEITEN TEIL IHRES BREITLING ARMBANDS.
TIPP:
DURCH VORSICHTIGE HANDHABUNG VERMEIDEN SIE DAS ZERKRATZEN DER INNENSEITE DES BANDANSTOSSES.

SCHRITT 5
PRÜFEN SIE, OB IHR NEUES ARMBAND SICHER BEFESTIGT IST, INDEM SIE LEICHT AN BEIDEN TEILEN ZIEHEN.
VIEL VERGNÜGEN MIT IHRER BREITLING AN IHREM NEUEN ARMBAND.
Wechsel Metallarmband

SCHRITT 1
NEHMEN SIE IHR NEUES BREITLING ARMBAND AUS DEM BREITLING REISEETUI UND PLATZIEREN SIE IHRE BREITLING UHR AUF EINER FLACHEN, GLATTEN OBERFLÄCHE. LEGEN SIE DIE UHR AUF DAS «GESICHT», SODASS SIE DEN GEHÄUSEBODEN SEHEN.
SIE KÖNNEN DAS BREITLING FEDERSTEGWERKZEUG VERWENDEN, SOFERN SIE EINES BESTELLT HABEN, ANSONSTEN FUNKTIONIERT DER AUSTAUSCH AUCH MIT EINEM HERKÖMMLICHEN BANDWECHSELWERKZEUG.

SCHRITT 2
ENTFERNEN SIE DAS VORHERIGE ARMBAND.
HALTEN SIE IHRE BREITLING-UHR FEST UND PLATZIEREN SIE DAS GABELENDE DES WERKZEUGS ZWISCHEN EINER DER BANDANSTÖSSE UND DER ARMBANDSEITE.
DRÜCKEN SIE DEN FEDERSTEG AUS DEM BANDANSTOSS-LOCH UND WIEDERHOLEN SIE DEN VORGANG AUF DER ANDEREN SEITE.
TIPP:
VORSICHTIGES HANDLING VERMEIDET KRATZER AUF DER INNENSEITE DES BANDANSTOSSES.

SCHRITT 3
ENTFERNEN SIE DAS ALTE ARMBAND.
HALTEN SIE IHRE BREITLING UHR FEST UND PLATZIEREN SIE DAS GEGABELTE ENDE DES WERKZEUGS ZWISCHEN EINEM DER BANDANSTÖSSE UND DER SEITE DES ARMBANDS.
DRÜCKEN SIE DEN FEDERSTEG AUS DEM BANDANSTOSSLOCH UND WIEDERHOLEN SIE DEN VORGANG AUF DER ANDEREN SEITE.
TIPP:
DURCH VORSICHTIGE HANDHABUNG VERMEIDEN SIE DAS ZERKRATZEN DER INNENSEITE DES BANDANSTOSSES.

SCHRITT 4
FÜGEN SIE DAS NEUE ARMBAND ZWISCHEN DEN BANDANSTÖSSEN EIN.
ORIENTIEREN SIE SICH AN DER TABELLE, UM IHR NEUES BREITLING ARMBAND DER SCHLIESSE ENTSPRECHEND KORREKT ZU POSITIONIEREN.
HALTEN SIE IHRE BREITLING UHR FEST UND FÜHREN SIE MANUELL EINEN STIFT DES FEDERSTEGS IN DAS BANDANSTOSSLOCH EIN.
TIPP:
VERWENDEN SIE DIE KORREKTEN FEDERSTEGE FÜR IHR ARMBAND.

SCHRITT 5
WÄHREND SIE DEN FEDERSTEG IN POSITION HALTEN, DRÜCKEN SIE DEN ZWEITEN STIFT DES FEDERSTEGS MIT HILFE DES GEGABELTEN ENDES DES WERKZEUGS IN DAS GEGENÜBERLIEGENDE BANDANSTOSSLOCH.
DREHEN SIE IHRE UHR UND WIEDERHOLEN SIE DEN VORGANG MIT DEM ZWEITEN TEIL IHRES BREITLING ARMBANDS.
TIPP:
DURCH VORSICHTIGE HANDHABUNG VERMEIDEN SIE DAS ZERKRATZEN DER INNENSEITE DES BANDANSTOSSES.

SCHRITT 6
PRÜFEN SIE, OB IHR NEUES ARMBAND SICHER BEFESTIGT IST, INDEM SIE LEICHT AN BEIDEN TEILEN ZIEHEN.
VIEL VERGNÜGEN MIT IHRER BREITLING AN IHREM NEUEN ARMBAND.
Einteiliges Uhrenarmband wechseln

SCHRITT 1
NEHMEN SIE IHR NEUES EINTEILIGES ARMBAND VON BREITLING AUS DEM BREITLING REISEETUI HERAUS.

SCHRITT 2
LEGEN SIE IHRE BREITLING UHR AUF EINE FLACHE, GLATTE OBERFLÄCHE UND ENTFERNEN SIE DAS AKTUELL ANGEBRACHTE EINTEILIGE ARMBAND.
ZIEHEN SIE DAS EINTEILIGE ARMBAND AUS DER ZWISCHENSCHLIESSE HERAUS.
HALTEN SIE IHRE BREITLING UHR FEST UND ENTFERNEN SIE DAS EINTEILIGE ARMBAND VOLLSTÄNDIG, INDEM SIE ES UNTER DIE BEIDEN FEDERSTEGE SCHIEBEN.

SCHRITT 3
DAS NEUE EINTEILIGE ARMBAND AN IHRER BREITLING UHR ANBRINGEN.
FÜHREN SIE DAS EINTEILIGE ARMBAND ZWISCHEN DEN BANDANSTÖSSEN DURCH DIE BEIDEN FEDERSTEGE.
FÜHREN SIE DAS EINTEILIGE ARMBAND DURCH DIE ZWISCHENSCHLIESSE, SOBALD ES ZWISCHEN DEN BANDANSTÖSSEN DURCH DIE BEIDEN FEDERSTEGE GESTECKT IST.
KORRIGIEREN SIE BEI BEDARF DIE POSITION IHRER UHR AM EINTEILIGEN ARMBAND.
VIEL VERGNÜGEN MIT IHRER BREITLING AN IHREM NEUEN EINTEILIGEN ARMBAND.
Elegant | Sportlich | ||
|---|---|---|---|
Tang-Typ Schnalle | 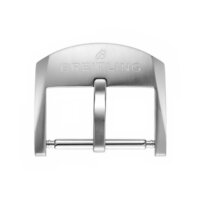 | 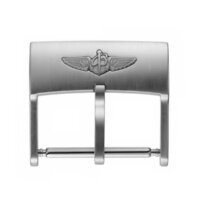 | KURZER STRANG UM 12 UHR, LANGER STRANG UM 6 UHR PLATZIERT |
Doppelte Tang-Typ Schnalle | 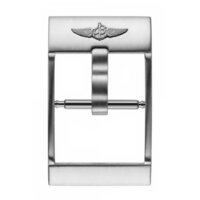 | KURZER STRANG UM 12 UHR, LANGER STRANG UM 6 UHR PLATZIERT | |
Klappschließe | 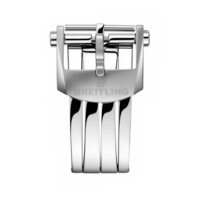 | KURZER STRANG UM 6 UHR / LANGER STRANG UM 12 UHR PLATZIERT | |
DRUCKKNOPF-KLAPPSCHLIESSE |  | PLATZIEREN SIE DEN TEIL DES BANDES, DER DEN DRUCKKNOPF DER KLAPPSCHLIESSE HÄLT, UM 12 UHR. |